If your Glock upgrade plan starts with better target acquisition and ends with a cleaner, faster sight picture, learning how to install optic ready slide components the right way matters. A slide swap looks simple on the bench, but fitment, optic compatibility, screw length, and function checks are what separate a sharp build from a frustrating one.
First, make sure the firearm is unloaded. Remove the magazine, lock the slide open, and visually and physically inspect the chamber. Keep all ammunition off the work surface while you work.
From there, slow down and confirm what you actually bought. Glock fitment is model specific, and generation fitment matters just as much as overall size. A Glock 19 Gen 3 slide is not the same fitment proposition as a Glock 19 Gen 5 slide, and a Glock 17 slide is obviously not interchangeable with a 19 frame. If you are installing a stripped optic-ready slide, you also need the correct internal parts, barrel, recoil spring assembly, and sights or optic setup for that exact platform.
This is where many problems start. The slide may look right, but if the channel liner, internals, or recoil assembly do not match the model and generation, reliability can suffer immediately.
You do not need a full armorer bench to install an optic-ready slide, but you do need the right parts. At minimum, have your compatible Glock frame, the optic-ready slide, a matching barrel, a matching recoil spring assembly, the proper slide internals if the slide is stripped, and your optic or cover plate if applicable.
A Glock tool or punch is helpful for frame disassembly and inspection. A torque driver is strongly recommended for optic screws because guessing by hand is one of the fastest ways to strip threads or create mounting issues. Thread locker may also be required depending on the optic and screw setup, but use only what the optic manufacturer recommends.
A complete slide is the simpler route. In most cases, it already includes the internal parts installed, and sometimes it also includes sights. You typically add your barrel and recoil spring assembly, then mount it to the frame.
A stripped slide requires more work and more attention to detail. You will need to install the firing pin assembly, extractor, extractor depressor plunger assembly, safety plunger, channel liner, back plate, and any model-specific internals. That process is manageable for experienced Glock owners, but it is less forgiving if this is your first build.
If your goal is clean installation with the fewest variables, a quality complete slide is the faster path.
With the firearm confirmed unloaded, field strip the pistol by removing the factory slide. Point in a safe direction, press the trigger as required for disassembly, pull the slide slightly to the rear, pull down the takedown tabs, and guide the original slide off the frame.
If your new optic-ready slide is complete, install the barrel into the slide first. Then seat the recoil spring assembly in its proper notch against the barrel lug. Make sure the recoil spring is centered and fully seated. A spring assembly that is slightly off can create cycling problems or prevent the slide from going fully into battery.
Next, align the rear slide rails with the frame rails and guide the new slide onto the frame. Run it fully to the rear and release it. Rack the slide several times. You are checking for smooth movement, proper lockup, and any obvious drag or resistance beyond normal spring tension.
If the slide does not move freely, stop there. Do not force it and hope it wears in. Recheck model and generation compatibility, inspect the recoil spring seating, and verify that the internals are installed correctly.
Knowing how to install optic ready slide hardware is only half the job. The optic mounting process is where precision really matters.
Some slides use a direct-milled footprint, while others use a plate system similar to MOS-style setups. A direct-milled slide is cut for a specific optic footprint, which usually gives you a lower mounting position and fewer parts between the optic and slide. A plate system offers more flexibility across optic brands, but it introduces another fitment point that must be correct.
Before mounting the optic, verify the footprint. Do not assume that all micro red dots use the same pattern. RMR, RMSc, DeltaPoint Pro, and Holosun-compatible footprints can differ in screw spacing, recoil lug geometry, and screw length requirements.
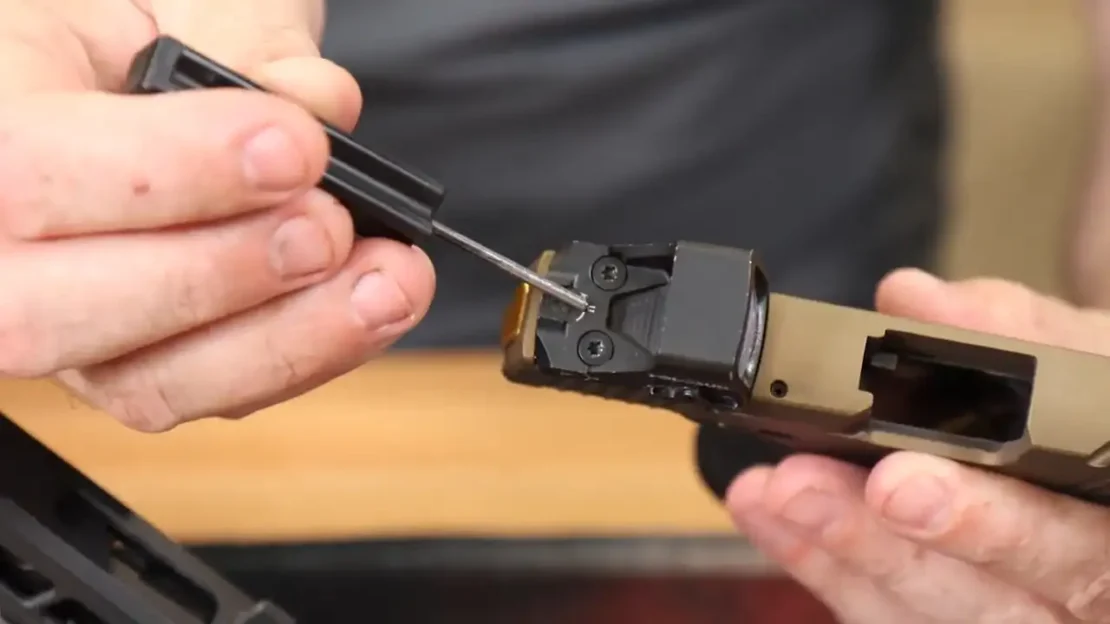
Place the optic or plate onto the slide and check for flush fitment. It should seat cleanly without rocking. If it does not, something is wrong with the footprint match, the plate selection, or debris in the cut.
When installing screws, use the correct length. This is a critical point. Screws that are too short may not hold under recoil. Screws that are too long can interfere with the extractor plunger assembly or other internal components and cause reliability issues that are hard to diagnose. Tighten to the optic maker’s torque spec with a proper torque driver, not feel alone.
Once the slide and optic are installed, perform a full function check before any live fire. Rack the slide and confirm it cycles smoothly. Dry fire according to safe handling procedures and reset the trigger by cycling the slide again. Make sure the trigger reset feels normal and the slide returns fully to battery.
Check that the optic remains solidly mounted and that the screws are properly seated. If suppressor-height sights are part of the setup, verify that they co-witness as expected and do not interfere with the optic body.
Also inspect ejection port clearance, extractor movement, and visible alignment between barrel and slide. Nothing should look forced, uneven, or out of place.
The biggest mistake is buying by appearance instead of fitment. A slide may have the right finish and window cuts, but if it is not built for your exact Glock model and generation, performance is irrelevant because it will not run correctly.
The second mistake is treating all optics as interchangeable. They are not. Footprint, screw length, plate compatibility, and optic height all affect the final result.
The third is rushing the install. Cross-threaded screws, incorrectly seated recoil springs, and incomplete internal assembly are all preventable if you take an extra few minutes and verify each step.
If you are comparing factory MOS to an aftermarket optic-ready slide, the answer depends on what matters most to you. MOS gives you a factory-origin path to optics mounting with broad recognition and straightforward support. An aftermarket slide can give you tighter styling, custom serrations, improved coatings, direct-milled optic cuts, window cuts, and a more performance-driven visual profile.
For many Glock owners, the aftermarket route makes sense because it combines optics readiness with the chance to tune the pistol’s look and feel. That said, the best slide is still the one matched correctly to your frame, optic, and intended use.
If you bought a stripped slide, if this is your first Glock build, or if you are unsure about optic screw fitment, professional installation is a smart move. There is no shame in protecting the reliability of a defensive or competition pistol.
The same applies if you notice unusual drag, failure to return to battery, inconsistent trigger reset, or optic mounting concerns after assembly. Those are not details to ignore.
A properly installed optic-ready slide should cycle smoothly, lock up consistently, and give you confidence the moment you rack it. The optic should sit solid, the sight picture should be fast, and the gun should retain the reliability Glock owners expect.
That is the real standard. Not just getting the slide on the frame, but building a setup that is precise, repeatable, and ready for the role you bought it for. If you take fitment seriously and respect the small details, an optic-ready upgrade can be one of the most worthwhile performance improvements you make.